Next Post
Baked Boneless Honey BBQ Chicken Wings with Spicy Ranch.
This post may contain affiliate links, please see our privacy policy for details.
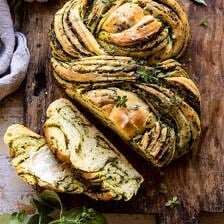
This light, doughy, and super soft bread is swirled with herb butter, hinted lightly with garlic, and makes for the most delicious and extra fancy companion to your dinner table. It’s easy, but impressive, and best served warm right out of the oven with just a little smear of butter. You will LOVE this bread. Bonus? This is a great way to use up all the end of summer herbs from the garden.

With Labor Day behind us, I’m ready to slowly start transitioning into the season the brings all the coziest recipes. I know it’s only the 3rd of September, and that the temperatures may still be warm, but autumn is in the air, especially around here. I couldn’t be more excited about this, as I said on Sunday, it’s my favorite season.

(dough log after slicing in half lengthwise)

With September here, my focus has shifted to a bit to cozier recipes. Recipes that are perfect for things like Sunday night dinner with the family, a simple gathering with friends, or tailgating before Sunday’s game (can you believe football starts on Thursday?).
Enter in this swirled garlic herb bread. It’s so pretty and so delicious. It’s going to be perfect for all your upcoming Sunday night family dinners, and gatherings with friends on fall evenings.
And the best part…while I mean, aside from the taste…while this bread may look super complicated to make, it’s really fairly simple. If you’re a visual person like me, the pictures within this post are going to be VERY helpful, so study them closely.

(dough after twisting)
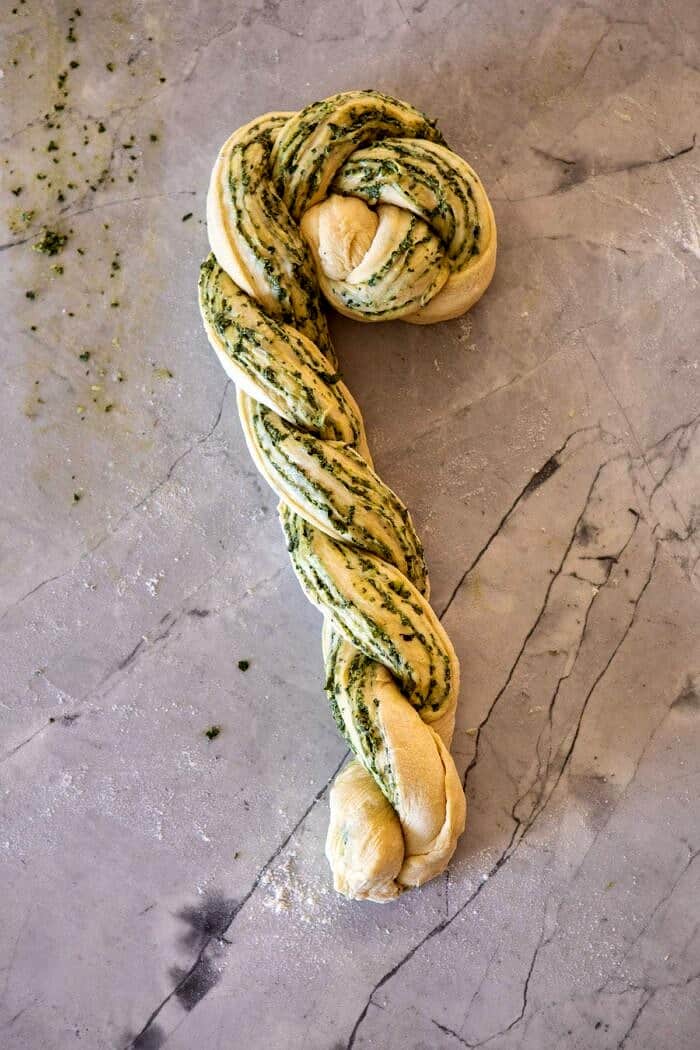
(dough after the 1st coil)

First, the dough. I used my go-to base dough recipe for soft breads. It’s kind of a mix between an eggy brioche bread and a more simple dinner roll type bread. It has your basic bread dough ingredients – milk, yeast, a touch of honey, eggs, flour, butter, and salt. Nothing new here, but yet still so good.
The real flavor in this bread is hidden between the layers. Or better yet, between the swirls, and it’s in the form of herb butter with garlic. The classic go-to flavors that I am craving so much of right now…
Well, that and the fact our herb garden is so full of end of summer herbs. So full that some of the basil is blossoming and becoming dry. Meaning, I need to use it up fast. So that’s kind of the reason for all the herb-filled recipes as of late. The good news is that I love herbs and I don’t mind using them in literally everything…even my cocktails.

For the butter, I used a mix of basil, thyme, and sage, BUT you all can use whatever herb combination you love most. I’m sure a touch of oregano or maybe some parsley would be great!
And another note…use salted butter and only just the right amount of garlic. The salted butter is key because it adds that special touch that makes everyone go back for a second slice, or two. For the garlic, I like to use 1-2 cloves. You want the flavor, but you don’t want it to overpower the bread, just a subtle hint.

Now, the rolling and twisting process.
I promise, this is not as scary as it looks. If you’ve made cinnamon rolls before you can make and shape this bread.
You’ll start out by rolling the dough up into a log. Then you simply cut the log in half vertically to expose those pretty, herby, buttery layers. Now, twist the two the pieces of dough over each other to create a loose twist. And finally, coil the dough up into a shape that resembles an S. Again, the words make it seem trickier than it really is. Use the photos as your guide, I’m telling you, they will help so much!!
Once you have the bread shaped, let it rise, and then bake. Please, please, please, enjoy this warm, right out of the oven, and preferably with a light smear of butter too.

SO GOOD. Oh, and the smell while this bakes? It. Is. Heavenly.
What every special dinner from now through December really needs…a side of pretty, swirled, garlic herb bread. I’d recommend serving this alongside one of my favorite September recipes, instant pot broccoli cheddar zucchini soup.
Can I use dried herbs instead of fresh?
Yes—dried herbs are more potent. A good general rule is to start with about one-third the amount and bloom them briefly in warm butter or oil for better flavor.
How do I keep the swirl from separating or leaking?
Roll the dough tightly, leave a clean strip to seal, and pinch the seam well. Proof until puffy before baking so the structure sets around the swirl.
Can I shape this as rolls or mini loaves?
Totally—divide the dough evenly and tuck into a buttered muffin tin or mini loaf pans. Keep the same visual cues: puffy before the bake, deep golden when done.
How do I know it’s baked through?
Look for a deep golden crust; the loaf should sound hollow when tapped and feel set in the center (not squishy). Let it cool before slicing so the swirls hold their shape.

If you make this swirled garlic herb bread be sure to leave a comment and/or give this recipe a rating! Above all, I love to hear from you guys and always do my best to respond to each and every comment. And of course, if you do make this recipe, don’t forget to tag me on Instagram! Looking through the photos of recipes you all have made is my favorite!
Nutritional information is only an estimate. The accuracy of the nutritional information for any recipe on this site is not guaranteed.

As Seen In


Love this recipe cannot wait to try it twill fresh herbs. Just wondering if you knew the calorie count on a slide or anything?
Hi Kristen! I am sorry, but I do not at the moment! I hope you still try this and enjoy it! Please let me know if there is anything else I can help with! xTieghan
Hahah well I apparently can’t read so I didn’t follow the directions quite right but it still turned out good! this is my first time making bread lmao and even with goofing the directions I’m still really proud of it. Good recipe !
I am glad this still turned out well for you, Elias!! Thank you so much! Please let me know if you have any questions! xTieghan
I made this and it was so delicious! but my bread spread in the oven; it baked all the way through but was just more flat than round. Any tips?
Hi Michelle,
Thanks so much for trying the recipe! My guess would be an issue with the yeast? Please let me know how else I can help. xTieghan
Hello!
I have an exorbitant amount of bread flour that I need to use up, would you happen to know how it would change the taste or texture of the bread?
Also, I LOVE your blog, and I hope you and your family are staying safe!
Hi Gabriela! Bread flour should work great for you! I hope you love this recipe! xTieghan
This was my first time ever making bread, but thankfully the instructions are clear and the pictures are helpful. It is BEYOND delicious and it’s so pretty too!!! It was so much fun to make and even more fun to eat! Thank you for always giving us the best recipes!
Thank you for trying them, Kyra! I am so glad this recipe turned out so well for you! xTieghan
I would love to know if anyone has had success with making this gluten free! I tried it with a cup-for-cup gluten free flour blend (3 1/2 cups) and it was so dry I couldn’t roll it up, forget trying to twist it! So dry that after baking it was unfortunately barely edible. Would love any GF feedback! Thanks!
Hi Emily! I am sorry to hear that, but I have not tried this with GF flour! I hope someone can help! xTieghan
Hello! Do you know if this recipe is okay to use fast rising instead of instant? I have active dry and fast rising yeast, otherwise I have all of the ingredients, I would love to make this! If fast rising is okay to work do you recommend changing anything up with the measurements/instructions?
Hi Kelsi! I recommend using active dry yeast with the warm milk and honey in the bowl of a stand mixer and mix with the dough hook until combined. Let sit for 5-10 minutes until foamy. Then follow the recipe as directed from here, adding in the eggs and remaining ingredients. Please let me know if you have any other questions. xTieghan
I would love to try making this – I don’t have a stand mixer do you think I would be able to hand mix the dough?
Hi Amanda! You can mix the dough by hand using a large mixing bowl, wooden spoon, and some elbow grease. Just mix until the dough comes together and forms a ball, this will take about 4-5 minutes. Then, once the dough is in a ball and smooth, continue on as directed! Please let me know if you have any other questions. I hope you love this recipe! xTieghan
Made this last night and it was SO GOOD! I didn’t have any fresh herbs, so just spread a thin layer of pesto (plus extra garlic and parm, of course!) as a sub for that layer. I thought the oil in the pesto would make a mess when baking or make the assembly step more difficult, but it turned out just like the photos! Will be making again, and again, and again…
Amazing! I am really glad this turned out so well for you, Dean! I hope you continue to love recipes of mine! xTieghan
This looks heavenly and couldn’t wait to give it a shot. Now waiting for bread to proof for it go in the oven❤️. Thank you Tieghan
Amazing! I hope this turns out well for you Neethi! Thank you for trying it! xTieghan
Hello!! I only have compressed cake yeast. How would I modify the recipe to use this yeast. Thank you!!
Hi Deborah,
I have never used compressed cake yeast, but it seems as though you should dissolve this in lukewarm water before mixing with the ingredients. I hope you love the recipe, please let me know if you have any other questions! xTieghan
Your directions were amazing and the bread came out great! It was also beautiful! But seemed a little dry, wondering if it could have used an egg wash or oil on top..
It was delicious!
Hi Joy,
Thanks so much for trying the recipe. You could totally do an egg wash on the top! Please let me know if you have any other questions! xTieghan
Hello!!! Do you have to activate the yeast prior to combining it with the milk etc? Thank you!!
Hi Delalma! I recommend coming active dry yeast with the warm milk and honey in the bowl of a stand mixer and mix with the dough hook until combined. Let sit for 5-10 minutes until foamy. Then follow the recipe as directed from here, adding in the eggs and remaining ingredients. Please let me know if you have any other questions. I hope you love this recipe! Thank you! xTieghan
This bread is easy and a show stopper! Oh, and versatile! Threw in some rosemary, think so many herbs would work. Next time I’ll probably more finely chop or muddle the herbs to get a more even green distribution, but the recipe is just great! Leftovers were perfect for lunch throughout the week.
Thank you so much Ashley! I am so glad this bread turned out so well for you! I hope you continue to enjoy it! xTieghan
Would this work with pesto? Thank you!
Hi Lizzy,
Yes that would be so delicious! I hope you love the recipe, please let me know if you have any other questions! xTieghan