This post may contain affiliate links, please see our privacy policy for details.
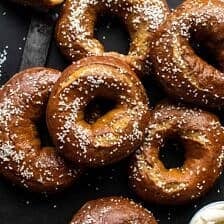
These are the bagels you’ll toast, butter, and devour—then immediately plan a second batch. A mix between a soft, buttery, salty pretzel and a slightly chewy bagel. They’re airy, perfectly salted, and every last bite is oh so buttery…the best of both worlds. These bagels are made using only pantry staples, require very little prep work, and are truly easier than heading out to your local bagel shop.
Why you’ll love this recipe
Buttery, salty pretzel top with classic bagel chew.
Pantry-friendly dough; no fancy equipment.
Great bake for game day, snow days, or weekend brunch.
Ingredient notes
Flour: Bread flour will be chewier; all-purpose works for a slightly softer pretzel.
Yeast: Instant keeps things easy; if using active dry, proof first.
Sweetener: Molasses or honey supports browning and that pretzel vibe.
Salt: Pretzel salt is ideal; kosher or flaky sea salt also works (different crystal sizes = different “saltiness”).
Butter: Brush mid-bake (your method) for that signature buttery finish.
Optional color boost: A baking-soda boil deepens color and pretzel flavor
Recipe Inspiration
I think the one thing we can all agree on right now is that a good project is just what we need. Not that these bagels are difficult by any means, but they are bagels. They require using your hands, your focus, and they’re sure to distract your mind from any anxiety you might have. Even if it’s only for an hour or so. Some days (maybe more than others) just call for a good baking distraction.
Sure, watching TV is great, but the returns from baking are far more delicious, especially when the baked goods are salty, buttery, pretzel bagels.
In all seriousness, I made these bagels over the weekend after contemplating making them for weeks. I wasn’t really sure how you all would feel about baking homemade bagels. But I also knew a homemade pretzel bagel had the potential to be incredible, and truthfully, I was stressed. I needed the distraction myself. So, I decided to give them a try, and after just one test, I knew this was a recipe that needed to be shared. These aren’t your average bagels…they’re BETTER, and super easy too!
Fair warning, the butter plus salt combination does make these bagels a little bit addicting…
Step by Step Details
If you’ve never made bagels, I know they can be intimidating, but the truth is, they’re really pretty simple. Especially with this recipe.
Mix & knead
Start by mixing the dough, then let it rise. This takes anywhere from one to two hours, it just depends how warm your kitchen is.
Mix until dough is smooth and slightly tacky, not sticky.
Knead to elastic—it should stretch thin (windowpane) without tearing.
First rise: Dough should puff and feel lighter; a gentle finger dent should slowly spring back.
Shape like a bagel
Divide evenly; keep pieces covered so they don’t dry out.
Once the dough has doubled in size, shape the dough into bagels. Meaning, roll into balls, punch a hole through the center of each ball, and create a bagel shape. EASY.
Shape tight balls → poke a hole → stretch to 1–1½-inch opening (it’ll shrink as it rests).
Second rise: Rings should look slightly puffy yet hold their shape.
Boil
The trickiest part about bagels is the boiling process, which actually isn’t tricky at all. Simply drop the bagels, a few at a time, into the boiling water and boil until they float. Boiling the bagels before baking gives them that chew factor, and that classic “bagel” taste. Pretzels are cooked in the same way.
Bagels should float within seconds; if they sink and stay, give them a few more minutes of proof.
Let excess water drip off so toppings stick.
Optional: Use a mild baking-soda bath for a deeper bronze pretzel crust.
Bake & finish (your signature butter + salt)
Brush each bagel with a beaten egg. This will give them a nice golden color.
Mid-bake: This is KEY. Bake the bagels, but about halfway through cooking, remove them from the oven and brush each generously with melted butter, and then sprinkle the salt. That’s the “pretzel” portion…and honestly? It’s the best part.
Return the bagels to the oven and minutes later you’ll have hot, buttery, salty pretzel bagels all ready to be eaten. And yes, your kitchen will smell better than your local bagel shop, trust me. Hints of butter, soft bread baking, and somehow you can almost smell the salt in the air.
Doneness cues: Deep golden-brown, firm shell, and they sound hollow when tapped on the bottom. Cool on a rack to keep tops crisp.
Oh! And one last idea, if you’re looking for something on the sweeter side, do this. Slice your pretzel bagel in half, toast it, butter it (be generous), and then sprinkle with cinnamon sugar.
Recipe Tips
My trick is to use instant yeast, which makes mixing up the dough easy and keeps the rising time very minimal. What’s really awesome is that these bagels require no fancy ingredients. Just water, yeast, molasses or honey, flour, salt, and butter.
I will say that using pretzel salt can elevate your bagels just a smidge. But of course, you can also use a good Kosher salt or flaky sea salt. They’re all salt, just different sizes, so it all works!
These bagels disappear quickly. If you want to have leftovers to freeze, I’d recommend doubling the recipe. Make a dozen for the week and a dozen to freeze and have ready at a moment’s notices.
These bagels are insanely delicious right out of the oven served with additional butter or a smear of cream cheese. They’re also great toasted and enjoyed for breakfast. Or use them to make your favorite sandwich. You can even serve them alongside dinner. The salt makes them perfect for just about any time of day.
I highly recommend freezing any bagels that aren’t eaten right away. The salt on top can cause the bagels to get soggy while being stored. Still perfectly good to eat, just not as enjoyable as when they are frozen and then toasted.
Do I need bread flour for pretzel bagels?
Bread flour gives the chewiest bite, but all-purpose works..the pretzel will just be softer.
Can I skip pretzel salt?
Yes—use kosher or flaky sea salt. Crystal size varies, so start light and adjust to taste.
How do I keep the tops from getting soggy?
Cool completely on a rack, then freeze what you won’t eat the same day. Toast to serve so the crust re-crispens.
Can I make the dough the night before?
Yes. Shape, cover, and refrigerate overnight; boil and bake straight from the fridge for great flavor and easy morning baking.
If you make these easy homemade pretzel bagels, be sure to leave a comment and/or give this recipe a rating! Above all, I love to hear from you guys and always do my best to respond to each and every comment. And of course, if you do make this recipe, don’t forget to tag me on Instagram! Looking through the photos of recipes you all have made is my favorite!
1. In the bowl of a stand mixer fitted with the dough hook, combine the water, yeast, molasses, flour, salt, and 2 tablespoons softened butter. Knead until the dough comes together, about 1-2 minutes. Cover and let sit in a warm place for 1-2 hours, until doubled in size.2. Preheat the oven to 425 degrees. Line two baking sheets with parchment paper.3. Once the dough has doubled, punch it down and place on your counter, using a little more flour if needed to prevent from sticking. Divide dough into 10-12 balls. Working with one piece of dough at a time, use your finger to poke a hole in the middle. Gently stretch the dough until the hole is about 1/2-1 inch big. Place the bagel on the prepared baking sheet. Repeat with the remaining pieces of dough. Cover the baking sheet with a damp kitchen towel and let the bagels rise for about 15 minutes.4. Bring a large pot of water to a boil and add the baking soda. Lower 2-3 bagels at a time into the water. Boil for 3 minutes then flip to the other side and boil for 1-2 additional minutes. Using a slotted spoon, remove the bagels from the pot letting the water drain. Transfer to a parchment paper lined baking sheet. Repeat until you've boiled all of the bagels.5. Brush each bagel with the beaten egg. Make sure there is no water piled up next to the bagels. Transfer to the oven and bake 10 minutes. Remove from the oven and brush the remaining 4 tablespoons melted butter over each of the bagels. Generously sprinkle each bagel with salt. Return to the oven for another 10-15 minutes, or until the bagels are golden brown. Let cool. Slice, toast, eat whole, slathered with butter or cream cheese!
Notes
Storing:Bagels will keep for 4-5 days in a sealed storage bag. But you may prefer to freeze them, as the salt on the bagels will begin to make them soggy.Freezing: Bagels can be frozen for up to 4 months in a freezer safe container. To Use Active Dry Yeast: Mix 1 packet (2 1/4 teaspoons) active dry yeast with the warm water and honey/molasses. Let sit 5-10 minutes, until bubbly and foamy on top. Add the flour and follow the directions as listed for the remainder of the recipe. To Make Gluten Free: Use an equal amount of your favorite gluten free flour blend in place of the all-purpose flour. I recommend Cup4Cup gluten free flour.
I would recommend that the boil be a little longer. Many of mine were a little too doughy after the bake. I think upon the flip, boil for 3 more min. I’m going to try again and see if that helps. the ones that did cook up well were very good. Sharing with neighbors during our sequestering. I got 16 bagels out of my dough. Good size too.
I am sooo making these ASAP!! The other day on your stories you said they could be made with sourdough? How does one do that? Haha I have ripe starter but am not sure how to incorporate into recipes! Thanks!
I am sooo making these!! I saw on your ig story the other day you said you could make them with sourdough… how does one go about doing that? I’ve got ripe starter but no clue how to use it besides in a basic bread recipe??♀️?
Quick question but first of all thank you And I love your recipes!!! I tried to review the comment to avoid redundancy. Could I make the dough on the dough cycle of my bread maker?
Hi fellow Rocky River person! I went to high school in RR. Now on day 14 of “shelter in place” in Alaska. These smell wonderful but they are very soft out of the oven. I baked them to a nice golden brown for the requested time. Are they supposed to be soft? I love your recipes Tieghan!
HI! Yes, these are meant to be a softer bagel, but if you bake them a little longer, the crust will harden a bit more 🙂 Please let me know if you have any other questions. I hope you love this recipe! Thank you!! xTieghan
This is my second time making bagels and they turned out SO MUCH better than my first…likely because of your recipe! This also kept me from making an extra trip to the grocery store. Thank you so much!
This recipe did not hit the mark for me. I have made bagels for years and wanted to try something different. I followed the recipe exactly and had good results up to the boiling. I think 3 + 1 minutes is far too long. It changed the appearance of the bagels. The baking temp/time are off too, in my view. I cut both down. Having said all that, the flavour was great.
Hi Andrew! I am sorry this did not turn out as hoped for you! Please let me know if there are any questions I can help you with! I hope you love some other recipes of mine! xTieghan
My goodness! I didn’t expect the taste! I was just making these with my daughter as a nice project. My husband was totally flabbergasted. He kept asking “what makes them taste like pretzels?”
Anyway, we are all happy and these pretzel bagels just blew our socks off. Thank you SO MUCH!!!!
HI! You can knead the dough by hand for 5 minutes. That will be great! Please let me know if you have any other questions. I hope you love this recipe! Thank you!! xTieghan
I’ve never made bagels before, but OH MY GOD! These are absolutely delicious and super easy to make. Everyone in my picky family loved them. Definitely making these again!
Juuuust finished making these since we are almost out of bread here and thought it would be a fun quarantine project. These would have burnt to a crisp had I not adjusted the temp on the oven (noticed another reviewer said the same thing after I was done). The first 10 mins they went in, I started to smell burning nearing the 7-8 min mark. Turned it down to 400 and rotated the cookie sheets. Then after the butter and salt and second bake portion, a couple mins in they started to look dark brown already, like if I kept it at 425 for the whole baking portion, it would have resulted in piles of ash as some of my parchment started to become already. Turned it down to about 350-375 for the remainder of the second bake. Second bake was total 10 mins and they were nearly burnt sienna dark brown on the outside and felt pretty cooked on the inside so just took them out. Inside texture was great. Outside not so much. Also, they totally stuck to the parchment and gonna have to carve off the bottom of each since they didn’t peel off cleanly. Finally, I think the honey I added didn’t get mixed properly and created ribbons in some bagels. Next time gonna mix all the liquids and dry items separately before combining in stand mixer. Should have done that to begin with but was on autopilot and the recipe didn’t specify. Inside – delicious, outside – gonna have to come up with my own baking time.


I would recommend that the boil be a little longer. Many of mine were a little too doughy after the bake. I think upon the flip, boil for 3 more min. I’m going to try again and see if that helps. the ones that did cook up well were very good. Sharing with neighbors during our sequestering. I got 16 bagels out of my dough. Good size too.
Hi Sharon! I am glad this still turned out well for you! I hope you love them even more next time! xTieghan
Hi,
Do you have any tips in getting the bagels smooth or is it normal to have some bumps and lines?
Hi Pam,
It is completely normal for these to have bumps and lines and look a bit rustic!
These turned out great! I made bagels and buns. The buns needed about 8 extra mins, they were perfect for burgers.
Love that! I am so glad this turned out so well for you Stephanie! xTieghan
I am sooo making these ASAP!! The other day on your stories you said they could be made with sourdough? How does one do that? Haha I have ripe starter but am not sure how to incorporate into recipes! Thanks!
I am sooo making these!! I saw on your ig story the other day you said you could make them with sourdough… how does one go about doing that? I’ve got ripe starter but no clue how to use it besides in a basic bread recipe??♀️?
Hi Serena,
I would recommend using 1/3 cup of the sourdough starter and then slowly adding flour from there until it comes together.
Hope this helps!
My kids and I made these pretzel bagels and they turned out amazing! Thank you for sharing this! 5 stars!
Thank you so much Megan! That is so sweet! xTieghan
These were incredible! I took the left overs and sliced thin and toasted them into bagel chips today w everything seasoning. OMG!!
Yum!! I am so glad this turned out so well for you Brooke! Thank you! xTieghan
Quick question but first of all thank you And I love your recipes!!! I tried to review the comment to avoid redundancy. Could I make the dough on the dough cycle of my bread maker?
HI! Yes, I am sure that will work wonderfully! Please let me know if you have any other questions. I hope you love this recipe! Thank you!! xTieghan
Hi fellow Rocky River person! I went to high school in RR. Now on day 14 of “shelter in place” in Alaska. These smell wonderful but they are very soft out of the oven. I baked them to a nice golden brown for the requested time. Are they supposed to be soft? I love your recipes Tieghan!
HI! Yes, these are meant to be a softer bagel, but if you bake them a little longer, the crust will harden a bit more 🙂 Please let me know if you have any other questions. I hope you love this recipe! Thank you!! xTieghan
This is my second time making bagels and they turned out SO MUCH better than my first…likely because of your recipe! This also kept me from making an extra trip to the grocery store. Thank you so much!
Love that!! And so glad these turned out so well for you Kristen! Thank you so much! xTieghan
This recipe did not hit the mark for me. I have made bagels for years and wanted to try something different. I followed the recipe exactly and had good results up to the boiling. I think 3 + 1 minutes is far too long. It changed the appearance of the bagels. The baking temp/time are off too, in my view. I cut both down. Having said all that, the flavour was great.
Hi Andrew! I am sorry this did not turn out as hoped for you! Please let me know if there are any questions I can help you with! I hope you love some other recipes of mine! xTieghan
My goodness! I didn’t expect the taste! I was just making these with my daughter as a nice project. My husband was totally flabbergasted. He kept asking “what makes them taste like pretzels?”
Anyway, we are all happy and these pretzel bagels just blew our socks off. Thank you SO MUCH!!!!
Thank you Yuliia! I am so glad you both enjoyed this recipe so much! I hope you are having a wonderful week! xTieghan
What if I don’t have a stand mixer? Can I still make these? Would you recommend kneading by hand or using a food processor?
HI! You can knead the dough by hand for 5 minutes. That will be great! Please let me know if you have any other questions. I hope you love this recipe! Thank you!! xTieghan
I’ve never made bagels before, but OH MY GOD! These are absolutely delicious and super easy to make. Everyone in my picky family loved them. Definitely making these again!
Amazing! I am so glad you all enjoyed these Katy! Thank you! xTieghan
Juuuust finished making these since we are almost out of bread here and thought it would be a fun quarantine project. These would have burnt to a crisp had I not adjusted the temp on the oven (noticed another reviewer said the same thing after I was done). The first 10 mins they went in, I started to smell burning nearing the 7-8 min mark. Turned it down to 400 and rotated the cookie sheets. Then after the butter and salt and second bake portion, a couple mins in they started to look dark brown already, like if I kept it at 425 for the whole baking portion, it would have resulted in piles of ash as some of my parchment started to become already. Turned it down to about 350-375 for the remainder of the second bake. Second bake was total 10 mins and they were nearly burnt sienna dark brown on the outside and felt pretty cooked on the inside so just took them out. Inside texture was great. Outside not so much. Also, they totally stuck to the parchment and gonna have to carve off the bottom of each since they didn’t peel off cleanly. Finally, I think the honey I added didn’t get mixed properly and created ribbons in some bagels. Next time gonna mix all the liquids and dry items separately before combining in stand mixer. Should have done that to begin with but was on autopilot and the recipe didn’t specify. Inside – delicious, outside – gonna have to come up with my own baking time.
Hi! I am sorry you had trouble with these bagels! If there are any questions I can help you with, please let me know! xTieghan