Next Post
This post may contain affiliate links, please see our privacy policy for details.
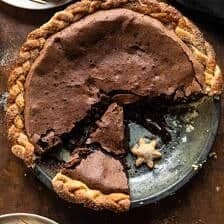
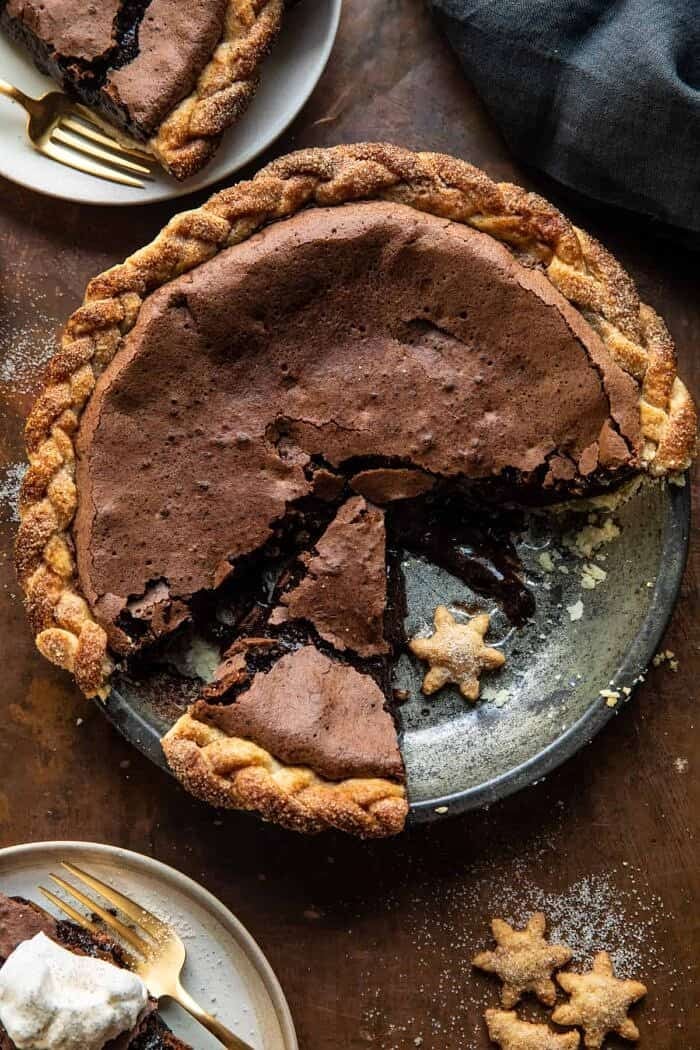
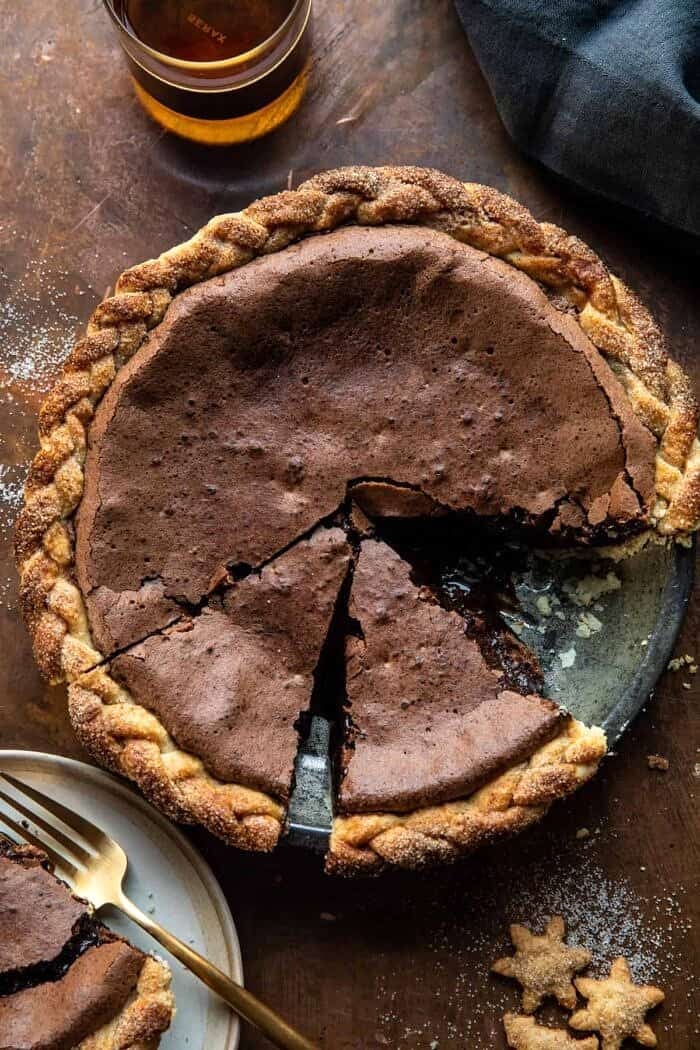
Molten Chocolate Crackle Pie…my new favorite Thanksgiving pie that rivals all others. A super simple chocolate pie made with eggs, cocoa powder, a touch of coffee, and sweet chocolate chunks. All baked together until puffed on top, but warm and gooey in the center. The crust is buttery, flaky, and sprinkled with sweet vanilla sugar. While the filling inside is warm, fudgy, and almost molten-like. Delicious when served with a dollop of vanilla hazelnut whipped cream. It’s the perfect Thanksgiving pie. Or maybe just your Friday night dessert!
Happiest Friday everyone! Today feels especially exciting. It’s been a long week for us all, but I love that we can end it on such a sweet note with some Thanksgiving pie!
I think the silver lining of this past year is that it’s really making me appreciate, and look forward to even the smallest things. Simple things like extra time at home with my little sister. Not having much travel booked through the end of the year. And feeling especially excited for the holiday season. Does anyone else feel the same way?
Everything this year just feels even more special and I want to make our holiday menu as close to perfect as can be! I spent a lot of time thinking about desserts for this year’s Thanksgiving dinner. The funny thing is that this pie is actually a pie I had on my “to make list” last Thanksgiving. I didn’t have enough time to make and test this recipe last year, so I saved it for this year.
And you know, I am so glad I did. In the words of little Miss Asher (my younger sister), “this pie rivals mom’s chocolate chip cookie pie“.
If you know anything about how special and delicious my mom’s pie is, then you know that if Asher is saying this pie rivals hers…
It. Is. GOOD!

The background.
My mom used to have a Hershey’s baking book way back in the day. It was filled to the brim with well over a hundred chocolate recipes. Yet, somehow, the only recipe we ever made out of that cookbook was a recipe for chocolate peanut butter cups.
Of course, would you expect anything else from us?
The cookbook had so many recipes from cakes, to brownies, to pies, and more. I remember it had a chocolate fudge pie that looked so rich and delicious with a brownie-like top, and chocolate fudgy center. That very first photo I have pictured in my head was the inspiration behind this pie…but I wanted my pie to be a little more molten-like and served warm.
Which brings me to today’s recipe. It’s really just a fudge pie with some special touches. It’s served warm with a big dollop of homemade hazelnut whipped cream.

The details.
While the pie is truly delicious and beautiful with that crackled top, it’s actually the simplest to make.
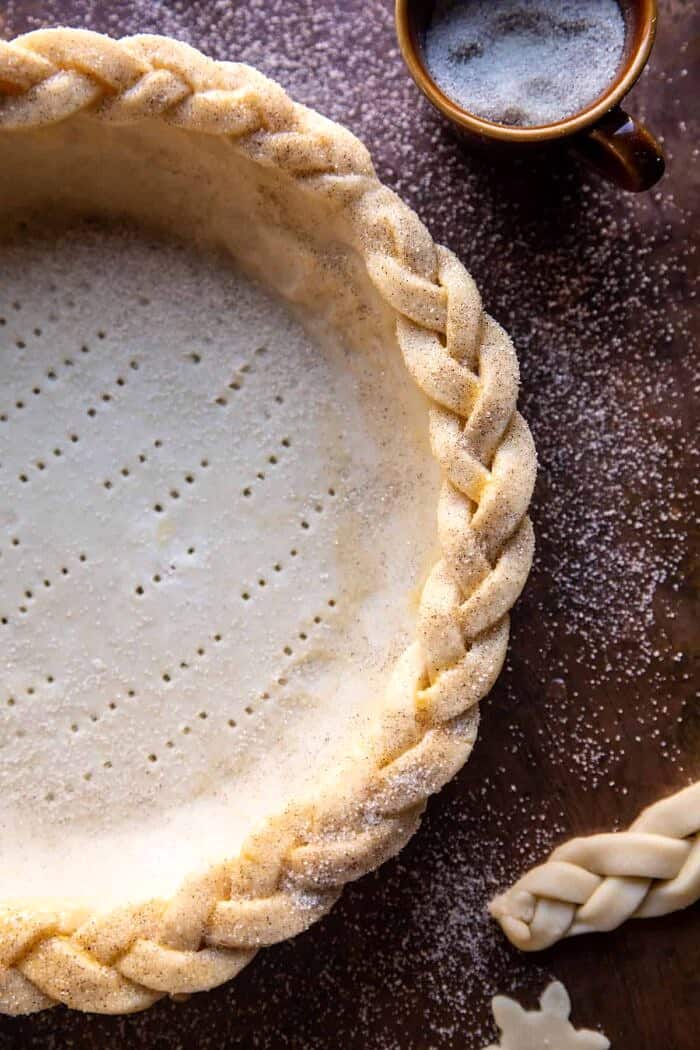
Start with the crust. I did make my own crust, and while I will tell you it’s better than store-bought, I will also tell you that if you don’t want to make the crust, you shouldn’t make the crust! Pies can be stressful, I get it. If the crust is stressing you out pick up your favorite from the store. I hear Trader Joe’s and Whole Foods have great options!
Once you have your crust sorted out, sprinkle it with vanilla sugar (simply just sugar mixed with vanilla beans), then pre-bake it. You want to get the crust cooked before adding the filling to ensure your crust stays crisp and flaky instead of just soggy.

While the crust is baking, work on the filling.
This is easy and you don’t even need a mixer. What you do need are eggs, a little cocoa powder, sugar, instant coffee, and butter. Plenty of butter for this one!
Just whisk it all together and done.
A few special touches.
One, hazelnut liquor, which is not needed, but it does add something special to the pie. The sweet liquor really helps to highlight all the rich chocolate within the recipe. it’s a pricey ingredient, but if you make a lot of holiday cocktails, it’s definitely a liquor I would recommend keeping on your bar cart.
The smell alone reminds me of the holidays.
Two, chocolate chunks (or chips) folded into the batter just before baking. The chunks are KEY. They help to create that gooey, almost molten-like center that everyone will find delicious.
And lastly, vanilla sugar sprinkled over top of the crust for an extra sweet finishing touch.

As soon as the pie comes out of the oven, it will be very poofed on top and wiggly in the center. As the pie cools, it will fall and set up.
Wait twenty or so minutes, then cut and serve while still warm and gooey, with an extra-large dollop of whipped cream. It’s like a mug of warm hot chocolate, a fudge brownie, and molten pie all in one.
Roll your eggs back, go for that second slice, and finish the pie in one sitting, GOOD.
Dramatic, but true.

You can easily serve the pie at room temperature or chilled. It’s always delicious, no matter what, but I like it warm best. Do what works for you though!
So with that, it’s Friday, and after Tuesday’s election I know we’re all feeling the need to de-stress. Game plan? Call it a week and end on a super sweet note with this pie. I always say it’s best to test any new holiday recipes before the holiday. So now you have a real reason to bake this up!
Enjoy! See ya tomorrow for our first Thanksgiving cocktail!

Looking for other Thanksgiving desserts? Here are my favorites:
Brown Sugar Maple Chocolate Pecan Pie Bars
Gooey Chocolate Chip Cookie Pumpkin Pie
Pecan Pie Cookies with Butter Pecan Frosting
Gooey Chocolate Chip Cookie Pie
Lastly, if you make this Molten Chocolate Crackle Pie, be sure to leave a comment and/or give this recipe a rating! Above all, I love to hear from you guys and always do my best to respond to each and every comment. And of course, if you do make this recipe, don’t forget to tag me on Instagram! Looking through the photos of recipes you all have made is my favorite!
watch our how-to video:
Molten Chocolate Crackle Pie
Servings: 8
Calories Per Serving: 606 kcal
Nutritional information is only an estimate. The accuracy of the nutritional information for any recipe on this site is not guaranteed.
Watch the How-To Reel
Ingredients
- 1 pie crust round (homemade recipe below)
- 1 egg, beaten, for brushing
- vanilla sugar or coarse sugar, for sprinkling (optional)
- 4 large eggs
- 1 1/2 cups granulated sugar
- 1/2 cup unsweetened cocoa powder
- 2 teaspoons instant coffee granules
- 1/2 teaspoon kosher salt
- 10 tablespoons salted butter, melted
- 1 tablespoon hazelnut liquor (optional)
- 2 teaspoons vanilla extract
- 1/2 cup semi-sweet chocolate chips or chunks
Hazelnut Whipped Cream
- 1 cup heavy cream
- 1 tablespoon real maple syrup
- 2 teaspoons vanilla extract
- 1 tablespoon hazelnut liquor (optional)
Instructions
- 1. Position a rack in the lower third of the oven. Preheat the oven to 375° F.2. Fit the pie crust into a deep 9-inch pie plate. Brush the edge of the crust with beaten egg, then sprinkle with vanilla sugar (or coarse sugar). Lightly prick the bottom of the dough with a fork. Line the crust with parchment paper and fill with pie weights, beans, or rice. Freeze 10-15 minutes.3. Bake until the crust is set, 20 minutes. Remove pie weights and continue baking until the crust is golden, 5 minutes. Remove from oven. Reduce the oven temp 350°.4. Meanwhile, whisk together the eggs and sugar until well combined. Add the cocoa powder, instant coffee, and salt. Whisk in the melted butter, hazelnut liquor, and vanilla, whisk until smooth. Fold in the chocolate chips. Pour the mixture into the baked crust.5. Bake for 45-55 minutes, until the pie is puffed on top, but still wiggly in the center. The longer you bake, the more set your pie will be. Remove from the oven and let cool slightly. Let cool 20-30 minutes, then serve the pie warm, dolloped with whip cream. Or chill and serve chilled with whipped cream. 6. To make the whipped cream, whip the cream using an electric mixer until soft peaks form. Add the maple syrup, hazelnut liquor (if using), and vanilla. Whip until combined and fluffy.
Notes
Vanilla Sugar: Mix 1/4 cup granulated sugar with 1/2 teaspoon vanilla bean powder or 1/2 a vanilla bean, seeds scraped.
All Butter Pie Crust
Servings: 2 crusts
Calories Per Serving: 1433 kcal
Nutritional information is only an estimate. The accuracy of the nutritional information for any recipe on this site is not guaranteed.
Watch the How-To Reel
Ingredients
- 2 1/2 cups all-purpose flour
- 1/2 teaspoon kosher salt
- 2 sticks (1 cup) cold salted butter, cut into 1/2 inch pieces
- 2 tablespoons hazelnut liquor (optional)
Instructions
- 1. In a food processor, combine the flour, salt, and butter. Pulse until the mix clumps together to form pea-size balls. Add the hazelnut liquor (if using), then add 1/2 cup cold water, 1 tablespoon at a time, until the dough comes together and forms a ball. If the dough feels dry, add 1-2 tablespoons additional water.3. Turn the dough out onto a floured surface. Roll out into 2 rounds. Use as directed.

This post was originally published on November 6, 2020


Made it today with mom and we both loved it!!! Great recipe and super delicious chocolate pie! Thank you!
My 93 years old mom loves to learn new things, she will post pictures of the pie on her Instagram 🙂 … #cookingbakingdanda
Hey Adriana,
I love to hear that this recipe was enjoyed, thanks so much for giving it a try! Have a great week! xTieghan
Can you instruct a little more on the crust part of the recipe? Does the vanilla sugar just go on the edge of the crust where the egg goes? What do you mean by the bottom when poking with a fork? Also how do you line with parchment paper, and when do you remove the parchment paper? Sorry not typically a dessert gal, especially pies!!
Hey Lindsey,
You really just want to follow the instructions as is. There is no parchment needed on the bottom of the crust, you are going to put it on the top so the pie weights don’t stick to the crust. Once you have the crust in your pie pan you will brush the edges with egg and then sprinkle with the vanilla sugar. Then you will take a fork and poke it around the bottom of the crust so it doesn’t bubble up and the air can release. I hope this helps. xTieghan
Sorry! Scratch my comment as it’s all there in the instructions:)
I hope you love the pie!
THE. BEST.
Rich but oh so yummy! After one bite my husband decided this is the dessert he wants me to make for his birthday.
Hey Brooklyn,
I love to hear that this recipe was enjoyed, thanks so much for giving it a try! Have a great week! xTieghan
I’m wondering if I prepare the filling earlier in the day, the place in fridge, it will be fine to bake later?
Hey Renee,
Yes, that should work well for you. I hope you enjoy the recipe, please let me know if you give it a try! xTieghan
hi! If I bake this earlier in the day, is there a way to re-heat it that will allow me to still have the molten center? Thank you!
Hey Alyssa,
You could par-bake and then finish baking when you are ready to serve. I hope the recipe turns out amazing for you, please let me know if you give it a try! xTieghan
Hi Tieghan!
I recently made this pie for a Friendsgiving and it was a hit! I am wanting to make it for my family’s thanksgiving but as individual mini pies. Any advice on adjusted baking times?
Thanks!
Hey Michelle,
Happy Friday!! Love to hear that you liked the recipe, thanks for giving it a try! I would probably reduce to 25-30 minutes depending how mini they are. Have a great weekend. xTieghan
Hi Tieghan,
I love this recipe and made it several times last year. Do you think I could make it a day ahead and refrigerate so I can travel with it for Thanksgiving?
We have the same mind, I’d love to know too!
Hey there,
Happy Friday!! Love to hear that you liked the recipe, thanks for giving it a try! Yes, that should work for you, I would probably wait to bake it until you reach your destination. Have a great weekend. xTieghan
can i make this without pie crust?
Hey Jill,
I haven’t tested this, but with the molten filling I would probably keep the pie crust. I hope you love the recipe, please let me know if you give it a try! xTieghan
Hi Teighan! I just made this, but the crust recipe you gave shrunk! I made a pretty leaf ring to copy yours. I did a pie weight out of beans as well. But it only covered the first .5” of the pie. Should I have covered it all the way up to the top? Or done something else? Thanks!
Hey Sage,
So sorry, I am not sure what you mean by it shrunk? Was there anything you adjusted in the recipe? If you want to create the leaves and a cute border you will need to use another pie crust for that part. I hope this helps! xTieghan
Sage, mine shrunk too. It was quite disappointing. I used one box of pie weights which only covered the bottom of the pie in one layer. I tried a second pie and used asmall bag of sugar as weight to fill the pie crust all the way to the design. This kept shape, but undercooked the crust on the bottom and burnt the design. Will need to keep experimenting, I guess.
What can I use instead of hazelnut liqueur if I cant find it? Also, is the instant espresso a baking espresso powder?
Hey Lauren,
The hazelnut liquor is optional so if you don’t have it just skip it. Here is the link for the instant espresso that I used:
http://l.thrv.me/HBH4356-mount-hagen-organic-instant-coff
Please let me know if you have any other questions! xTieghan
I would like to make this with a homemade Oreo crust because I don’t have time to make a pie crust and don’t like store-bought ones. Should I pre-bake the Oreo crust just like I would a normal crust, or should I just put the filling in while the crust is raw? Just not sure if the cooking time with pre-baking would be too long for an oreo crust, or if it would fall apart without pre-baking.
Hey Rebecca,
I have not tested this, but I would probably pre-bake the crust for best results. I hope this recipe turns out amazing for you, please let me know if you give it a try! xTieghan
I made this with a pre-made Oreo crust that I found in the baking aisle. It turned out amazing and I didn’t do anything extra – just added the filling to the crust and baked per HBH instructions for 45 mins. So good!!!
Hey Courtney,
Happy Friday!! Love to hear that you liked the recipe, thanks for giving it a try! Have a great weekend. xTieghan
Can you make the pie dough if you don’t have a food processor?
Hey Katie,
You could also use a pastry cutter to make the dough. I hope you love this recipe, please let me know if you give it a try! xTieghan
Hi, I would like to make the batter a few hours in advance before my company comes and then put it in the oven so that I can serve it warm and molten. How many hours in advance would it be okay to prepare the raw batter in advance before baking? Also, do you have instructions for how to use refrigerated store-bought raw pie crust with this recipe?
Hey Rachel,
I would make the batter no more in advance than the morning of. You can follow the recipe as is with a store bought crust. I hope you love this pie, please let me know if you give it a try! xTieghan
This pie was so good and was a crowd pleaser!!! Will definitely be making again. Special thanks to Tieghan who answered a question for me on IG when I wasn’t sure what to do with storebought crust! Can’t wait to make more HBH recipes!
Thank you so much for giving this recipe a try, I’m so happy to hear it was enjoyed! 🙂 xTieghan