Next Post
Browned Butter Jalapeño Cornbread Muffins.
This post may contain affiliate links, please see our privacy policy for details.
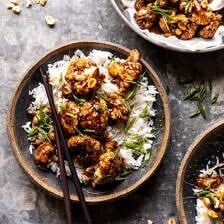
Sharing my healthier twist on a classic Chinese dish with this Better Than Takeout Kung Pao Cauliflower. Oven-roasted cauliflower tossed in a sweet, spicy, and sticky kung pao sauce. I’ve swapped the chicken for nutrient-packed cauliflower, and replaced the deep frying with oven roasting. This kung pao cauliflower is the perfect healthy, but still delicious, alternative to the traditional heavier sugary version. It has a quick 30 minute cooking time and uses pantry staple ingredients. Making this recipe perfect for any night of the week.

This feels like a very appropriate Monday recipe. Vegetarian? Check. Gluten-free? Check. Healthy? Check. Vegetable filled? Check. Delicious? Absolutely.
Aside from possibly a salad, this is the ideal Monday night dinner. It’s beyond good, super easy, and pretty dang healthy too. Yet, it tastes more like guilty pleasure take-out style food. So it’s also crave-worthy.
Promise it’s not too good to be true. It’s all in the uniqueness of a head of cauliflower. And yes, I know cauliflower is being used a lot right now, but I’ve shared several cauliflower recipes over the past six years. Including these popular sriracha buffalo cauliflower bites and this Indian coconut butter cauliflower.

And like the rest of the world, I’ve been obsessed with cauliflower ever since I realized how many different foods it can be substituted into. I’m not sure why I haven’t shared this recipe sooner. It’s one that has been on my list for a few months now. Think of your very favorite takeout style Kung Pao chicken. Swap the deep-fried chicken for lightly breaded and roasted cauliflower. Swap the sugar-filled sauce with a less sweet and much healthier version. Put the two together and you have the BEST vegetarian Kung Pao recipe that doesn’t even taste “healthy”.
It’s SO GOOD.

I don’t have a whole lot to ramble on about…except this recipe…so let’s jump right in!
As you might guess from all the above, this is a really simple recipe, with only two parts…

Step one is all about preparing the cauliflower. To keep this recipe light and healthy, I skipped the breading and deep frying and instead tossed the cauliflower in a light “batter”. Then I threw it under the broiler to give it a quick char. I find this method to work SO well, and I actually prefer it to deep frying. Which yes, I did try and ended up not liking very much. Cooking the cauliflower in the oven allows for it to hold its shape and retain flavor. With frying all I tasted wad the oily breading…roasting is tastier, easier, and healthier too.
Into it!

While the cauliflower is cooking, start step two, the Kung Pao sauce. Not going to lie, this is what this recipe is all about. Yes, the cauliflower is good, but it’s really just a vessel for the sauce to “stick” to.
And trust me, this sauce is so very good.
It’s a mix up of salty soy sauce, sweet and tangy hoisin sauce, rice vinegar, garlic, ginger, and green onions. The hoisin sauce is the key, it lends a sweet and tangy flavor that sets the sauce apart from others. It’s addictingly good and a condiment I always like to have on hand for easy Chinese inspired recipes at home. It’s not the healthiest sauce to buy store-bought though. So when I have time I really like to make homemade hoisin sauce via this recipe on Bon Appétit. It allows me to control the ingredients going into the sauce and make it tangier and/or spicier too!
When I don’t have time to make my own hoisin, this one is my favorite from the store. A little goes a long way!
Aside from the hoisin, this sauce is hinted with garlic, ginger, and green onions, making it incredibly flavorful.

The sauce comes together in about 5 minutes on the stove-top. Then slide in the cauliflower, toss to combine, add salty roasted peanuts, and DONE. Yes, it’s that easy and quick. In fact, it’s so quick that you can probably make the entire dish and have it ready before your rice is finished cooking. Hint, start the rice before you get to work on the cauliflower.
The sauce coats the cauliflower and it’s beyond perfection. Sweet, sticky, salty, tangy, and a touch spicy…you don’t even realize you’re eating a vegetable.
Serve over your favorite steamed rice, or even quinoa. You’ll have a vegetable-filled dinner that’s satisfying and so delicious.
Monday night takeout…only made at home, made healthier, and honestly, better than the real deal takeout.
Looking for other “better than takeout” style recipes? Try my coconut butter cauliflower, 20-minute peanut noodles, szechuan noodles with sesame chili oil, or my favorite weeknight udon noodles.
Next up on my takeout style recipes? Thinking about chicken fried rice. Thoughts?

If you make this Better Than Takeout Kung Pao Cauliflower, be sure to leave a comment and/or give this recipe a rating! Above all, I love to hear from you guys and always do my best to respond to each and every comment. And of course, if you do make this recipe, don’t forget to tag me on Instagram! Looking through the photos of recipes you all have made is my favorite!
Nutritional information is only an estimate. The accuracy of the nutritional information for any recipe on this site is not guaranteed.

As Seen In


Amazing!!!!! Go to summer lunch:)
Thank you Kim! xTieghan
Thanks for the inspiration. I loved the look of this recipe, but ours turned out way too salty. My husband loves salt and could barely finish his plate. We used the hoisin that is linked above, and Braggs liquid aminos, so I’m not sure where we went wrong. I suggest using unsalted peanuts, and maybe just using less soy sauce / liquid aminos until you find the flavor you like.
Hi Emily! I am so sorry to hear that! Thank you for trying this recipe. I hope others of mine turn out better for you!! xTieghan
It’s so good! Mine turned out a bit salty but I think that may have been due to the hoisin I chose. Check the label on this product and adjust salt accordingly.
Thank you Erika! xTieghan
SO GOOD! My meat-loving boyfriend devoured it all and didn’t even complain about it being veg! This will definitely go on my rotation!
Thank you so much Regan! xTieghan
Oo, I made this tonight! I’ve been needing some new dishes, and these gorgeous photos drew me right in! My (adult) son and I LOVED it. I subbed a few things to match what was in my pantry (cashews for peanut type subs) and next time I’ll make sure to have everything. Also we tend to need a little more protein at night so I threw in a few shrimp w the cauliflower… tofu probably next time. Thanks for what you do! Your artistry awes me.
I am really glad you and your son loved this recipe, Toni! Thank you so much for trying this and I hope you love other recipes of mine! xTieghan
I am am not a fan of cauliflower, but I LOVE this dish! I love finding meatless dishes that don’t make me feel deprived. It was pretty salty (I used store bought housin and low sodium soy sauce), but still probably way healthier than the fried takeout version. The flavor was better than any of the local takeout restaurants. Will definitely make it again.
Hi Sarah! I am so glad you loved this recipe! Thank you so much for trying it! xTieghan
Excellent recipe! I followed it to a T and it was easy and delicious. I served it over veggie fried rice and it was a hit with my husband.
That is so amazing Robin! Thank you so much! xTieghan
Hi. Made this last night. Delicious. Question about cornstarch amount. Ingredient list calls for 2 TBL. But recipe calls for 2 TBL for the cauliflower, and 2 TBL for the sauce. I followed the recipe and used 4 TBL in total. Next time believe I’ll make my own hoisin because our store bought was super salty, and we have a less salty palate. We enjoyed it over blown rice. So easy and delicious. Definitely will make again and again. Thank you!
Hey Penny! So sorry about the typo, you only about 2 tablespoons cornstarch. Please let me know if you have any other questions. I so glad you love this recipe! Thank you! xTieghan
Could one use arrowroot starch in place of the cornstarch?
I made this yesterday and my parents, who never come back for seconds, came back for thirds. Amazing recipe!
Thank you so much Tina! xTieghan
Tieghan, your use of the phrase “classic Chinese dish” and then “traditional heavier sugary version” in the opening paragraph of this post is inappropriate. The traditional dish is neither heavy nor sugary. I for one would appreciate it if you could change it to something like “classic takeout dish” or something more accurate and respectful.
Hi Elana, I am sorry if I have offended you in anyway. That was not my intention and I do apologize that my words have offended you. I will take this into consideration and adjust the wording a bit. I hope you love this recipe! Thank you! xTieghan
Hey looks awesome can’t wait to make/eat!
However, soy sauce does actually have gluten :(.
What to replace?
Hi Wendy! I would suggest using Braggs Liquid Aminos! It does not contain gluten and tastes the same as soy! I hope you love this recipe! xTieghan
Super tasty.
I stir fried a couple of diced chicken breasts and added them to the sauce with the cauliflower. Needed a bit of water to thin out, but it’s a keeper. Photo on Instagram.
I cannot wait to check it out! Thank you so much Allyson! xTieghan
Love this series. i cook one of the easier than takout dishes at least once a week. Orange chicken or katsu curry might be fun dishes for this series as well.
Thank you so much Marloes! I hope you try this one! xTieghan
Hi Tieghan,
This may be a stupid question but how do you make light fluffy rice. I love to cook but something so easy like cooking rice I screw up. My rice comes out starchy and clumpy no matter what I do. Any suggestions?
Thanks,
Bobbi Jo
Hi Bobbie! I love the recipe I use for the below dish. It works great for me every single time. You don’t need to add the sesame oil or seeds if you are just looking to make plain white rice. Please let me know if you have any other questions. I hope you love this recipe! Thank you! xTieghan
https://fett-weg.today/30-minute-korean-beef-and-peppers/%3C/a%3E%3C/p%3E