Next Post
Easy Healthier Crockpot Butter Chicken
This post may contain affiliate links, please see our privacy policy for details.
I really love homemade bread, especially this homemade naan. I put together step by step photos and instructions for you guys, so there is really no messing up this one! There is even a video…..ok, you guys have to try this!! You won’t regret it, promise!

Well, actually my mom really loves homemade bread and I love to making her happy! I think I will always love making my mom happy, whether I am nineteen or fifty (oh my gosh, I cannot even imagine). It’s just something that makes me happy, so I guess it’s a win win!
Plus, I mean homemade Naan? Yeah, there is not much better. It’s stinkin amazing!
It’s so easy that I thought you guys would like seeing the process a little bit. The pictures are not awesome, but you’ll get the idea. So here we go!
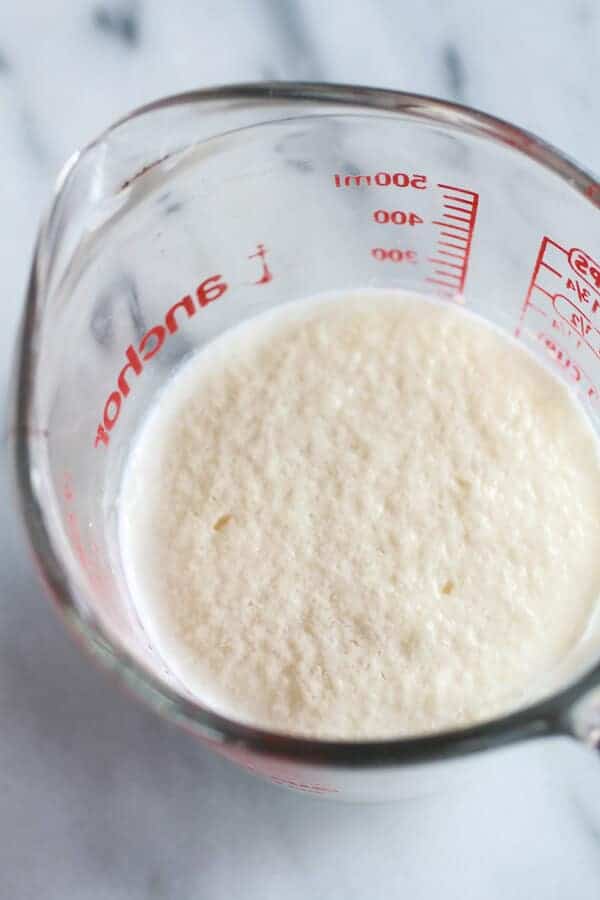
Start by activating the yeast. Combine the warm water with the sugar and yeast. Let sit for 10 minutes until foamy. It should smell bread like.
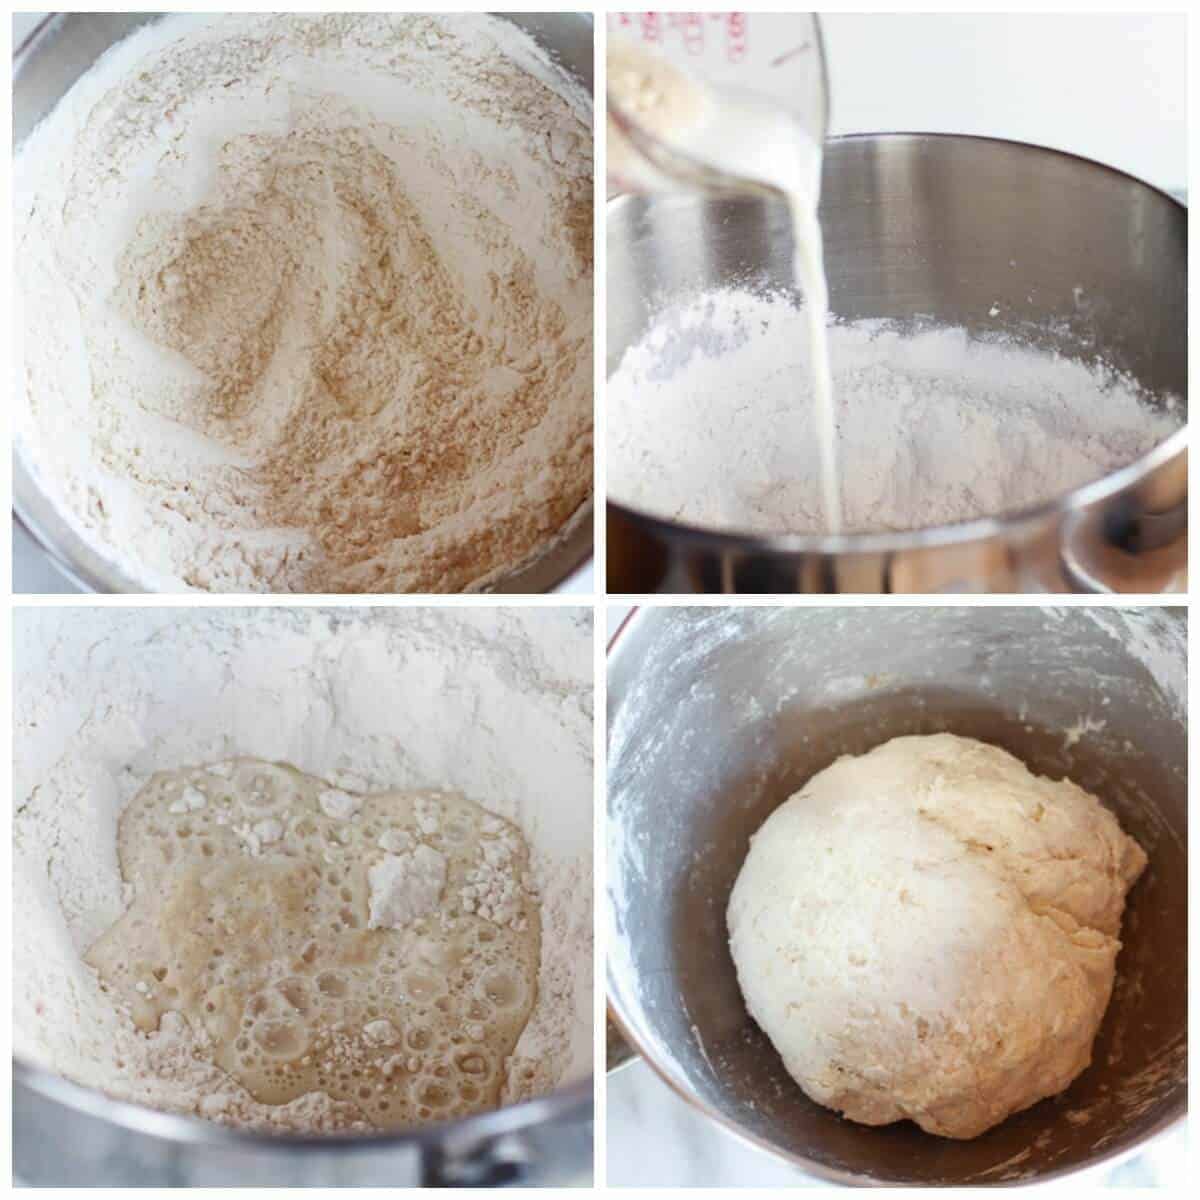 Add the flour, baking powder and baking soda to a large bowl. Then add the warm milk and yogurt to the yeast mixture. Pour the yeast into the flour. Mix with a wooden spoon until dough starts to come together and then finish mixing the dough with your hands until a smooth but still sticky ball forms.
Cover the dough with a damp towel or plastic wrap and let sit in a warm place for one hour.  After one hour punch the dough down and divide into eight equal balls. Using a rolling-pin, roll each piece of dough into an oval shape. The dough should be about 6-8 inches long and about 1/4-inch thick, but no thinner. Repeat this method with the rest of the dough.
Warm a cast iron skillet over medium-high heat (you want a hot pan). Brush both sides of the Naan with melted butter and if desired sprinkle on any spices you enjoy, such as cumin and garlic. I did not flavor my Naan, but only because one, I know my family is picky and two, I knew we would be eating the leftover Naans for breakfast and well I love garlic, I do not normally want it for breakfast!

Place the Naan on the hot skillet, cover and bake for 1 minute, until you see bubbles starting to form. Flip and cook for 1-2 minutes on the other side until large toasted spots appear on the underside. Brush with a bit more butter if desired and sprinkle with a little kosher salt, fresh cilantro (loved the fresh cilantro naans) or other herbs. Place the Naan in a tea towel-lined dish. Repeat with the rest of the Naans.
Done!
Pretty easy, right?

And so good!
It is actually very similar to this pita bread, but maybe even better. I think it is the yogurt in the dough. It adds the best flavor and oh my gosh it is so soft and those giant air pockets? Yeah they are awesome!
Seriously,
I just can’t even get over these. There are no words.

Nutritional information is only an estimate. The accuracy of the nutritional information for any recipe on this site is not guaranteed.

Except expect yum!
As Seen In


I.Need.to.try.this.right.now!!
thank you for putting this up….found this post through pinterest!
You are so welcome!! Hope you love them!
Your naan is beautiful! This makes me want to go out for Indian buffet!
Thank you! Don’t go out, make it!
My husband works with a gentleman from India and we eat at some Indian Cafes and Naan is very good and you can flavor it with onions, garlic or your favorite herb. Thank you for this recipe. It will get a lot of use.
You are so welcome, Trish! I hope you love this recipe!
I can’t wait to make this! And I can’t believe it’s so easy! Thanks for sharing the recipe!
Thanks Elizabeth!
Love seeing an indian recipe here! I’ve been meaning to try making Naan and guess what, this will become my go-to recipe!
Thanks! I hope you love it!
Naan has always been one of those things that don’t happily translate from the restaurant to the grocery store. Thus, my home table has been sadly bereft of it. Can’t wait to try out this recipe!
Thanks Sarah! I hope you love this!
I disagree 🙂 I think your photos are beautiful. Is it common to use baking soda and baking powder with yeasted breads? What’s the purpose? how does it affect the flavor? very interesting post. And I do love Naan bread. Yours looks absolutely delicious.
Hi paul! It is not all that common to use baking powder and baking soda in a yeast bread recipe, but it is traditional in most Naan bread recipes. Although some recipe only call for baking powder, baking soda or yeast. It just depends on the recipe and after testing a few out I settle on this combo. I believe it helps to keep the bread very soft and light!
Thanks so much, Paul!
Thanks! this is interesting! I’m gonna have to experiment a bit here. Your naan certainly looks very very soft and light. I would like to see what happens applying this concept to regular bread recipes.
I look forward to trying out your recipe. Your naan looks amazing…
Thanks so much!! Hope you love it!
your naan looks perfect. soft and pillowy sounds great!
Thanks Dina!
Oh My! These naan’s look like the ones I order at my fav Indian restaurant here in Atlanta! I always thought I could never duplicate them – but now – now I can be dangerous! 🙂 Thanks lady!
Oh you so can!! You have to try it!
Thanks Shashi!
I am making this tonight, Tieghan! It will make every sandwich and soup that it’s dunked in so much dreamier! Thanks for existing. 🙂
Oh my gosh, I hope it turns out awesome for you!! Let me know!!!
Have been wanting to try Naan for forever (b/c my family loves it) but wasn’t sure how. This is an incredible post! Referring to it when I get the guts to finally make it:) The texture looks spot on!
Thanks Mary! I hope you make soon, I know you will love it!
I’ve been wanting to make Naan for such a long time but haven’t. I figured it was a little more complicated than it actually is! Thanks for showing me that it’s easy peasy! Great photos too. 🙂
Thanks Ashley!
I love Naan, but always thought it was one of those complicated things to make. Now though I think it’s something I can handle, and I can’t wait to try.
It’s so easy! You have to try it, Kristi!
I only just recently discovered naan. It was served with crab dip and now, I’m obsessed with it! So I’m super excited to see this homemade version and the step by step instructions. Fantastic!
Thanks Kim! Hope you give it a try!