Next Post
Easy Healthier Crockpot Butter Chicken
This post may contain affiliate links, please see our privacy policy for details.
I really love homemade bread, especially this homemade naan. I put together step by step photos and instructions for you guys, so there is really no messing up this one! There is even a video…..ok, you guys have to try this!! You won’t regret it, promise!

Well, actually my mom really loves homemade bread and I love to making her happy! I think I will always love making my mom happy, whether I am nineteen or fifty (oh my gosh, I cannot even imagine). It’s just something that makes me happy, so I guess it’s a win win!
Plus, I mean homemade Naan? Yeah, there is not much better. It’s stinkin amazing!
It’s so easy that I thought you guys would like seeing the process a little bit. The pictures are not awesome, but you’ll get the idea. So here we go!
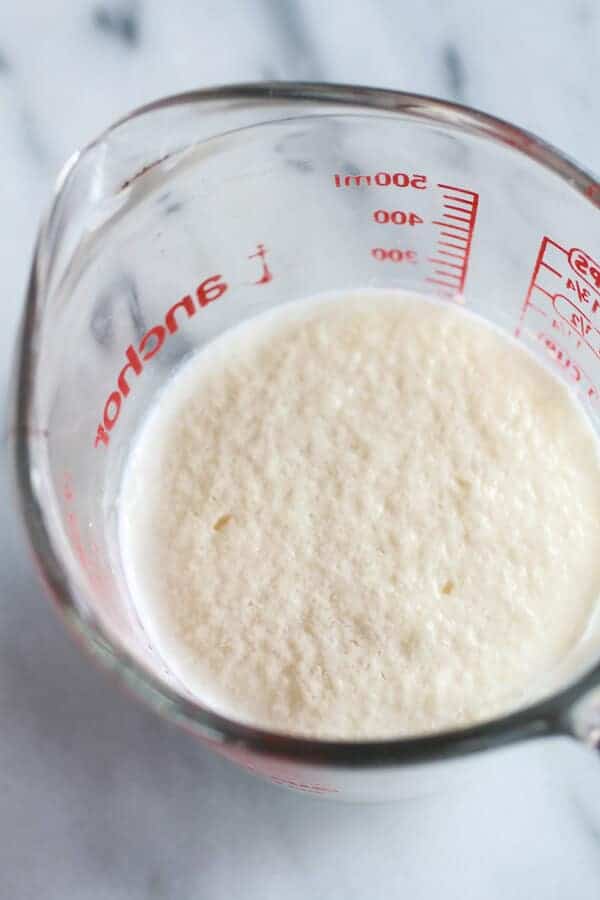
Start by activating the yeast. Combine the warm water with the sugar and yeast. Let sit for 10 minutes until foamy. It should smell bread like.
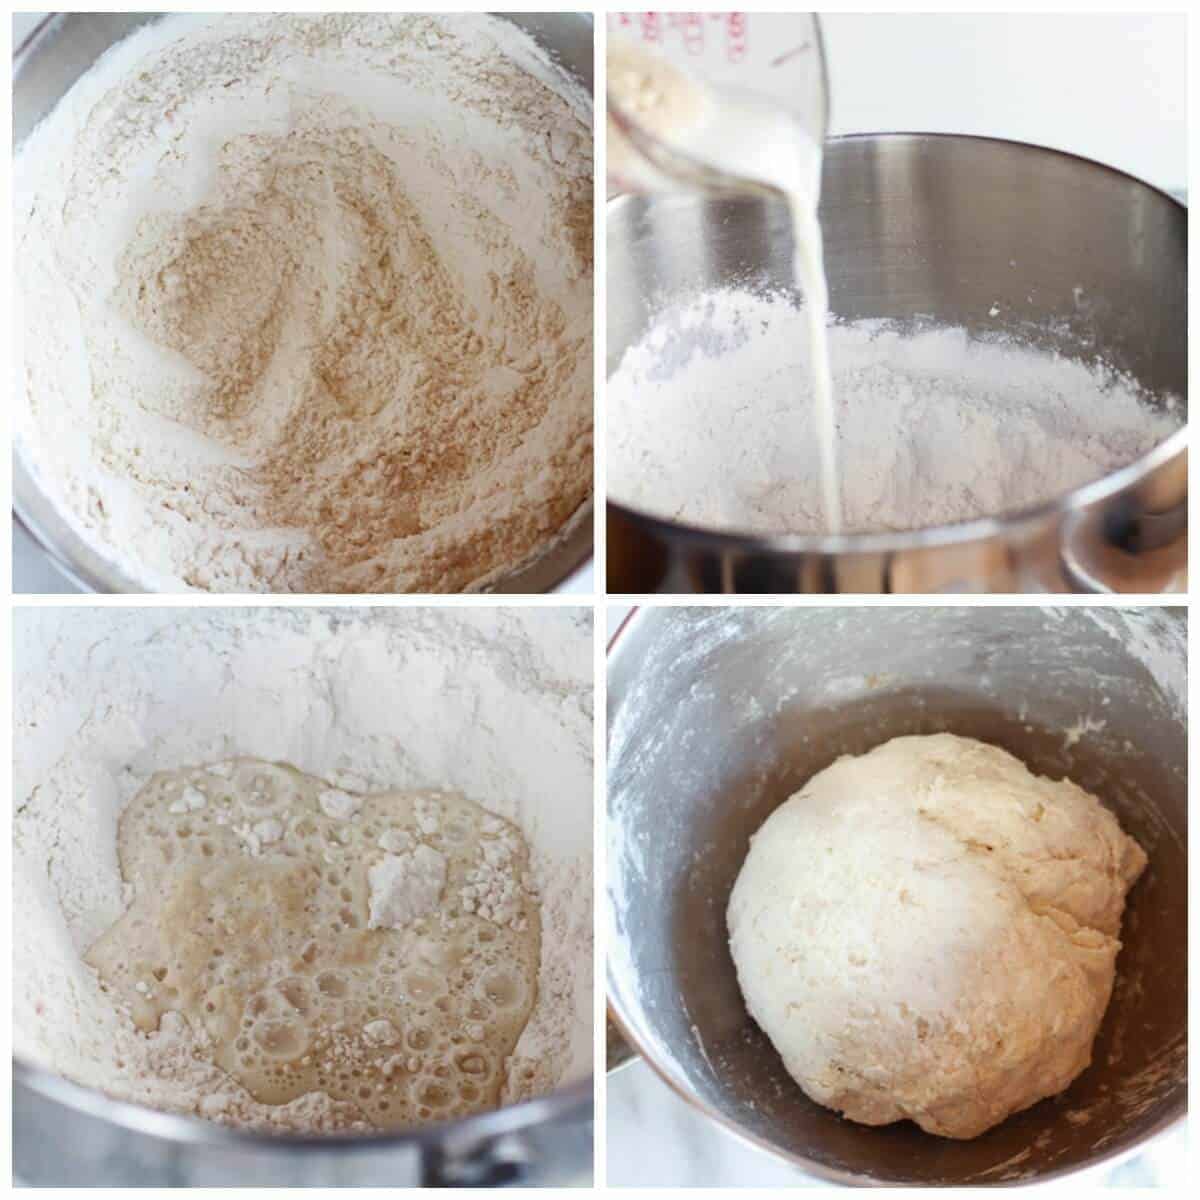 Add the flour, baking powder and baking soda to a large bowl. Then add the warm milk and yogurt to the yeast mixture. Pour the yeast into the flour. Mix with a wooden spoon until dough starts to come together and then finish mixing the dough with your hands until a smooth but still sticky ball forms.
Cover the dough with a damp towel or plastic wrap and let sit in a warm place for one hour.  After one hour punch the dough down and divide into eight equal balls. Using a rolling-pin, roll each piece of dough into an oval shape. The dough should be about 6-8 inches long and about 1/4-inch thick, but no thinner. Repeat this method with the rest of the dough.
Warm a cast iron skillet over medium-high heat (you want a hot pan). Brush both sides of the Naan with melted butter and if desired sprinkle on any spices you enjoy, such as cumin and garlic. I did not flavor my Naan, but only because one, I know my family is picky and two, I knew we would be eating the leftover Naans for breakfast and well I love garlic, I do not normally want it for breakfast!

Place the Naan on the hot skillet, cover and bake for 1 minute, until you see bubbles starting to form. Flip and cook for 1-2 minutes on the other side until large toasted spots appear on the underside. Brush with a bit more butter if desired and sprinkle with a little kosher salt, fresh cilantro (loved the fresh cilantro naans) or other herbs. Place the Naan in a tea towel-lined dish. Repeat with the rest of the Naans.
Done!
Pretty easy, right?

And so good!
It is actually very similar to this pita bread, but maybe even better. I think it is the yogurt in the dough. It adds the best flavor and oh my gosh it is so soft and those giant air pockets? Yeah they are awesome!
Seriously,
I just can’t even get over these. There are no words.

Nutritional information is only an estimate. The accuracy of the nutritional information for any recipe on this site is not guaranteed.

Except expect yum!
As Seen In


Do you think this would work using dairy free yogurt?
HI! I am not very familiar with dairy free yogurt, so I am really not sure. I would think a coconut or goat milk yogurt would work well! Please let me know if you have any other questions. I hope you love this recipe! Thank you! xTieghan
I made it! Yum-o! Easy and delish! It was fun to get out the ol’ rolling pin. Thank you! Will post on my IG account soon.
Would you be able to sub the flour for a premixed GF flour without changing anything else in the recipe?
Hey Alex, I have not tested this with GF so I can’t say for sure. I would think it should work just fine. Please let me know if you have any other questions. I hope you love this recipe. Thanks so much!! xTieghan
This is the best tasting and textured Naan bread recipe I’ve ever made.
Thank you so much Alex! I am so happy to hear that!
And my comment went up three times, bah! ?
No worries haha! I am just so glad you loved this naan recipe!
Hi Tieghan! I love this naan recipe and use it all the time! I have found to get it as tender and flaky and bubbly as yours that I need to let it rise longer (for example, a minimum of 3 to 4 hours and preferably all day, punching down every few hours). This may be because I am at sea level and you are in the mountains, but I thought I would pass it along! ?
Hi Tieghan! I love this naan recipe and use it ALL the time. I’ve been letting it rise for longer lately and have found it has made the texture more chewy and flaky and bubbly like your beautiful naan pictured in the recipe (for example, I made a batch in the morning and let it rise all day, punching it down and turning it every 2 hours or so and was by far my best batch ever!). This difference might be because I’m at sea level and you are in the mountains, but I wanted to pass it along. 🙂
Hi Tieghan! I love this naan recipe and use it ALL the time. I’ve been letting it rise for longer lately and have found it has made the texture more chewy and flaky and bubbly like your beautiful naan pictured in the recipe (for example, I made a batch in the morning and let it rise all day, punching it down and turning it every 2 hours or so and was by far my best batch ever!). This difference might be because I’m at sea level and you are in the mountains, but I wanted to pass it along. 🙂
I am so glad you have been loving this recipe, Claire! Thank you for your tips, I am sure they will help others!
Think almond flour would work? Maybe part coconut flour?
HI! I am not sure, I have never tested the recipe with alternate flours. I would recommend a GF flour blend as I have heard other have had success with a GF flour blend. Please let me know if you have any other questions. I hope you love this recipe! Thank you! xTieghan
Finally made these today with my new cast iron skillet. WOW how can I ever buy store bought naan again, you’ve completely ruined it for me 😉 I’m salivating thinking of eating the leftovers tomorrow…..
I am so glad you loved this!! Thank you Rachael!
Made this gluten free as I have sensitivities and it was great! Not as bubbly as I imagine the regular version is but so so good. Thank you!
Thank you so much Claire!
Awesome naan! Just a heads up though, that I clicked “skip to recipe” which doesn’t mention kneading by hand, only that I should stop kneading. Of course I found what I was looking for when I came back to the computer to actually read your post. Thanks again for all that you do!
Thank you for mentioning that! I am so glad you enjoyed this Adelae!
amazing! Delicious! I can’t believe I made naan!
I am so glad you tried this! Thank you Renee!
Just used this recipe for naan this evening and they are delicious! Quick and easy to make! I had some still warm with hummus and chickpea salad — amazing:)
Thank you so much Molly!
I am officially hooked on naan. I love homemade bread and honestly, this has just made my obsession with homemade bread grow like twenty-fold. Also, the simplicity of the recipe will make it so easy to make when I head back up to school. I am so excited to go back to school (I never thought I would say that) just so I can make this for me and my roommate.
I am so glad you love this Peyton! Thank you!