Next Post
Caprese Prosciutto Farro Salad.
This post may contain affiliate links, please see our privacy policy for details.
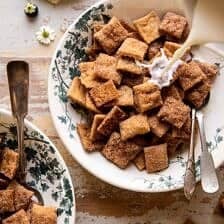
Better than store-bought Homemade Cinnamon Toast Crunch. Yes, you can make cinnamon toast crunch at home. It’s way easier than you think, and yes, it will be better than store-bought cereal, so much better. This homemade cereal is extra crunchy, has a touch of butter, is flaky, perfectly sweet, and heavy on the cinnamon. Every bite is roll your eyes back good. It’s best enjoyed any time of day…with milk, as an ice cream topping, or simply by the handfuls.

Well, this is an exciting Tuesday. We’re making homemade cinnamon toast crunch and it’s truly one of my best recipes yet.
You guys? This homemade cereal recipe is so good. It brings back all the best childhood memories. And honestly, it’s not only a million times better than the boxed stuff, but it’s also simple to make. If you can roll out pie dough, you can bake up your own homemade cinnamon toast crunch cereal. Plus…it’s going to be so fun!

cinnamon toast crunch before baking

There was a lot of inspiration from different places for this recipe, so let me walk you through it all.
First and foremost, as a kid cinnamon toast crunch was my favorite cereal (then Cheerios, but I was never that into any other cereals). I’m really not sure how one could not love cinni toast crunch…it’s one of the best cereals out there. If the boxed stuff wasn’t so bad for me, I’d probably still eat it regularly. I’ll forever love anything cinnamon toast.
Two, after making homemade Twix bars, homemade Chocolate Fudge Pop Tarts, and then, homemade Frosted Brown Sugar Cinnamon Pop Tarts, I was left wanting to create more homemade versions of my childhood favorites. Something about quarantine life has left me wanting all the nostalgic foods from my past. Is that weird? I don’t know, but I sure am having a lot of fun creating (and improving) on the boxed foods we all ate (and loved) growing up.

Next, most everyone is home right now. Many of you are home with your kids and they are bored. I don’t personally have kids, but I have my little sister, Asher, visiting me often…and she is bored. Asher’s favorite cereal? Cinnamon Toast Crunch…though she’s never had the boxed kind. My parents just don’t buy that stuff anymore (correction – Asher says she has had it at her cousins in Cleveland). But I’ve made this homemade version before and Asher has always loved it. When I told her what I was making on Sunday, her eyes widened with excitement and we had a lot of fun baking this together. So, my point? This is a great recipe to bake up if you have bored kids at home.
And finally, with summer so close, I feel like a bowl of homemade Cinnamon Toast Crunch would be the perfect lazy summer morning breakfast. No cooking, just add cold milk…a chill laid back morning with a bowl of sweet, crunchy breakfast cereal.

Pretty darn close to perfect, right?
PS. dying to know what everyone’s favorite cereal was/is? Are you all about Cinnamon Toast Crunch? What’s your favorite? Please…do share.

This cinnamon toast crunch cereal is simple. As I mentioned, if you can roll out pie dough, you can make cinnamon toast crunch. It’s a very simple mixture of whole wheat flour, all-purpose flour, cinnamon, butter, vanilla, and a touch of sugar too. Just seven ingredients. All of which you can find in your pantry and fridge.
At least that’s my hope.
The cinnamon adds flavor directly to the dough. The butter creates a flaky bite, the vanilla adds flavor, and the sugar sweetens it all up. Start by mixing together the cinnamon and sugar. See, super simple.

Now, mix up the dough. I like using the food processor to easily mix the dough and create the flakiest, crunchiest cereal, but you can simply use your hands as well in a large bowl. Once the dough is mixed, it’s time to roll it out.
The key is to roll the dough pretty thin, I’m talking about the thickness of a quarter. This will give you the crunchiest cereal.
Once the dough is rolled out, I then transfer it to a sheet of parchment paper, brush with butter, and sprinkle with that cinnamon sugar. At this point, cut the dough into little tiny squares.

Next, transfer the parchment paper to a baking sheet and separate the squares, spacing them apart. After a lot of testing, I find the method of cutting the dough first and then transferring to a baking sheet to be the easiest, and to work the best.
Finally, you bake. No chilling needed, just bake for a little over ten minutes, the smells are wonderful. You can eat warm, but these are best once cool. As they cool they become crunchy and so delish.
And that’s pretty much it. Could not be simpler, and the end result is roll your eyes back good.

Well, I don’t know for sure. It’s been a while since I had my last bowl of cinnamon toast crunch, but this cereal does taste really, really good. And if my memory serves me correctly, yes these taste just like cinnamon toast crunch. But Asher says…better. You can really taste the real cinnamon with undertone flavors of vanilla and sweet butter.
And everyone’s second question…can you enjoy this cereal with milk? YES, you can. And it’s beyond GOOD. It’s also great by the handful or when served atop ice cream or even yogurt. The options are endless, but for me, it’s best with cold milk or just by the handful for snacking. What’s your pick?
And guys, that’s about it. This cereal is the simplest to make and every single ingredient is a pantry staple. Meaning you have zero excuses to not bake these up this week. Promise it will be fun, and yes, so delicious!

Looking for other homemade favorites? Here are a few…
Frosted Brown Sugar Cinnamon Pop Tarts
Homemade Healthy Samoas Cookies
Lastly, if you make this homemade cinnamon toast crunch cereal, be sure to leave a comment and/or give this recipe a rating! Above all, I love to hear from you guys and always do my best to respond to each and every comment. And of course, if you do make this recipe, don’t forget to tag me on Instagram! Looking through the photos of recipes you all have made is my favorite!
Nutritional information is only an estimate. The accuracy of the nutritional information for any recipe on this site is not guaranteed.

As Seen In


It looks very delicious. Fantastic.
Thank you!!
Thank you so much!
Instead of using a parchment paper on the bottom and then transferring onto your sheet pan, you can roll onto a silicone mat and then use something that won’t damage it to cut (I’ve used a plastic pastry roller or frosting spatula). Then just lift the whole mat and put on your pan. The pieces will separate as they bake.
Ah such a good idea! Thank you!
Can the Whole wheat Pastry flour be substituted? I’d like to attempt to make these Gluten Free, but wondering if I omit the Whole Wheat pastry flour and use GF flour for all of the flour called for would change the texture too much?
So i ended up trying the recipe with GF flour, It was AWESOME!!! I substituted all the flour in the recipe with equal amounts of “Bob’s Red mill 1-1 GF flour blend”. (Not Bob’s Red Mill regular GF flour blend – it has chickpea flour in it–BLAH!!). The cereal turned out fabulous. Your recipe says the dough will be a little dry but with the GF flour it was just the opposite… a little moist. So I lightly floured my hands, took my ball of dough and divided it into 6 equal portions. Then I lightly floured my work surface and kneaded in gel food coloring and rolled them out and baked them as per your directions. I left the cinnamon/sugar mixture off the top and they turned out AMAZING!!! They became a coloring sorting/snack for my kiddos. I cant believe how much they taste like the real thing. Thank you for sharing this recipe. 🙂
YEAH! That is awesome, thanks so much for letting me know. So glad it worked out! 🙂
Hmm, I have never tried that, so i really can’t say. I think it could be done, but again, I don’t know for sure. Let me know how it goes!
Just a heads up–your site is automatically redirecting to a phishing page as a “Microsoft Alert” which gives an 800 number for you to “talk to an engineer.” DO NOT CALL THEM. And please, whomever you’ve teamed up with to allow ads on your page, I would look into them before agreeing.
Thank you so much for letting me know. I will look into this ASAP.
What is silpat? Do you mean silicone? I’m confused. I hate to put it this way, but did you spell check before publishing? I think “papper” is “paper”. Am I correct? This looks like a great recipe but it is difficult to read because of these mistakes(?).
Hi!! Yes, a silpat and silicone are the same thing. Silpat is just the brands name. So sorry for the confusion. Please let me know if you have any questions at all. Thanks!
How long will this keep for, if stored in air tight container?
Hey Lia! It will keep two week, thanks!
I was quite impressed with how well this turned out!
Next time I will add a little salt though. Also I really wish I had made them thinner (but I was hungry, couldn’t wait to try! LOL). I did not use whole wheat, I used unbleached flour. Did not put any white sugar either and they were swell! Thank you so much for the recipe! Will make again and again.
Hi Mavis! So happy to hear they worked out and you liked them!! Thank you(:
Thanks for the recipe but there is still wayyy to much sugar. Your daily safe intake of sugar is exceeded in one cup. Boo! I’ll tweak it to be actually healthy but a good start. Thanks!
Hi!
I can’t wait to try these! Can you sub coconut sugar for the regular sugar in the recipe?
Yes! Coconut sugar will be great! Hope you love this!
My daughter asked for this cereal by name. I’m going to buy it, make this homemade and then switch. And see what happens….
Hi, thanks for posting this recipe. Any thoughts on how well it would hold-up inside a hollow cake for about 12-15 hours? Would the moisture be too much and ruin it, do you think? Or is it more like a pie crust and able to handle a bit of moisture. Thanks for any feedback. I want to make a cereal center for my kid’s ‘piñata’ cake. (https://www.nordicware.com/store/product_detail/pinata-cake-pan#.VAAV7rxdUYE) I plan to cut it into star shapes rather than squares–have you tried a cookie cutter with the dough?
Hi! I think the cereal should hold up pretty good, but I cannot be positive since I have never actually tried it. And cookie cutters work great for this!! Hope you all love it. Thanks!
This recipe is amazing! I tried it out and it came out really good! I listed you on one of my blog posts…although, I do not know how you got the dough so thing, round two is coming, lol! thanks for an amazing blog to browse:)
My turn out great, but when my boy put the milk in, it sought of gone mushy immediately. If you eat it dry it’s great. I do not know if you have any suggestions for that?
So far so good. I used half cake flour and half whole wheat flour for the WW pastry flour, we live overseas so I don’t even know if it is available. I accidently used the extra 1 T of coconut oil in the dough since it wasn’t seperated with the sugar & cinnamon topping. They taste amazing and baked up light and crispy, like a cinnamon graham cracker. The true test will be tomorrow morning when the kids eat it for breakfast. Even if they don’t work as cereal I’m sure they will eat them by the handful.
Oh, and I made mine with the kitchen aid, so it can be made without a food processor!
Nice! Thanks for the tip!
Hope you really love them!! Thanks!
Oh wow! I never, ever would have guessed you could make these at home! I wonder if you could candy dried blueberries in maple syrup and have blueberry cinnamon toast crunch…